Introduction
Have you ever wondered how to take your WordPress website to the next level by harnessing the power of Amazon Web Services (AWS)? Migrating your WordPress site to AWS using EC2 and RDS can significantly enhance your website’s performance, scalability, and security. But the process can seem daunting, especially if you’re new to cloud computing.
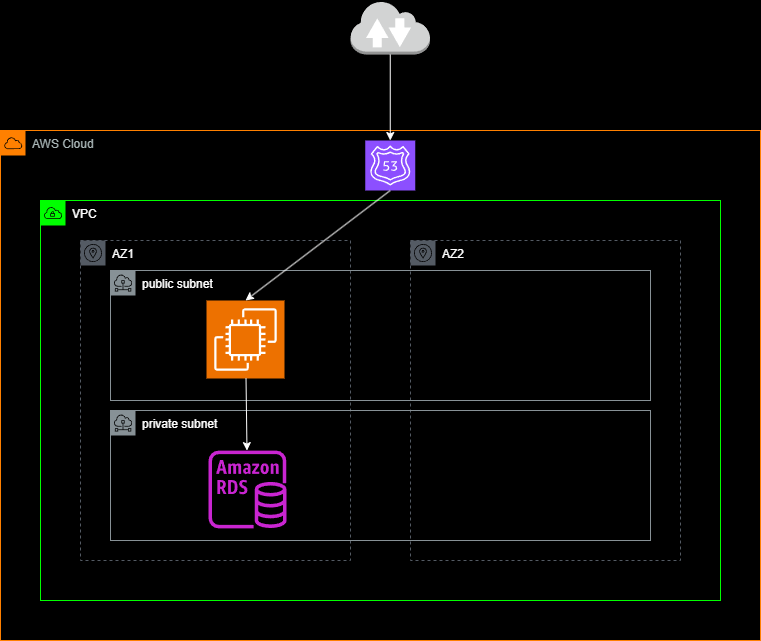
In this blog post, I’ll walk you through the step-by-step process of migrating your WordPress website to AWS using EC2 for your server and RDS for your database. Whether you’re a seasoned developer or just starting out, we’ll break down the complex aspects of this migration into easy-to-follow instructions. By the end of this guide, you’ll have a fully functional WordPress site running on a robust, scalable AWS infrastructure, ready to handle whatever traffic comes your way. Let’s get started!
Prerequisites
Before starting, ensure you have:
- An active AWS account
- Basic knowledge of WordPress
- Familiarity with SSH and command-line interfaces
- A backup of your existing WordPress site and database
Step 1 – Setting Up Your AWS Environment
Launch an EC2 Instance
- Log in to your AWS Management Console
- Navigate to EC2 service
- Click “Launch Instance”
- Choose an Amazon Linux 2 AMI
- Select an instance type (t2.micro is suitable for most small websites)
- Configure instance details, add storage, and configure security group
- Launch the instance and save the key pair
Create a MySQL Database with Amazon RDS
- Navigate to RDS service in AWS Console
- Click “Create database”
- Choose MySQL as the engine type
- Select the desired version and instance size
- Configure storage, connectivity, and security settings
- Create the database
Step 2 – Preparing Your EC2 Instance
Connect to Your EC2 Instance
- Open your terminal or SSH client
- Use the following command to connect: Copy
ssh -i /path/to/your-key-pair.pem ec2-user@your-instance-public-dnsInstall Required Software
- Update your system: Copy
sudo yum update -y - Install Apache web server, PHP, and related modules:
sudo amazon-linux-extras install -y lamp-mariadb10.2-php7.2 php7.2 sudo yum install -y httpd- Start Apache and enable it to run at system boot:
sudo systemctl start httpd sudo systemctl enable httpdStep 3 – Migrating Your WordPress Files
Transfer WordPress Files
- Use SFTP or SCP to transfer your WordPress files to the EC2 instance
- Copy files to the Apache web root:
sudo cp -R /path/to/wordpress/* /var/www/html/Configure WordPress
- Update the wp-config.php file with your RDS database details
- Set proper permissions:
sudo chown -R apache:apache /var/www/html/ sudo chmod -R 755 /var/www/html/Step 4 – Importing Your Database
Import Database to RDS
- Connect to your RDS instance using a MySQL client
- Create a new database for WordPress
- Import your WordPress database dump:
mysql -h your-rds-endpoint -u your-username -p your-database-name < your-database-dump.sqlStep 5 – Configuring DNS and SSL
Update DNS Settings
- Obtain the public IP address of your EC2 instance
- Update your domain’s DNS settings to point to the EC2 instance IP
Install SSL Certificate
- Install Certbot for SSL:
sudo amazon-linux-extras install epel -y sudo yum install -y certbot python2-certbot-apache- Obtain and install SSL certificate:
sudo certbot --apache -d yourdomain.comStep 6 – Final Checks and Optimization
Test Your Website
- Visit your domain in a web browser
- Check for any broken links or missing images
- Test all functionality, including forms and plugins
Optimize Performance
- Install and configure a caching plugin like W3 Total Cache
- Set up Amazon CloudFront for content delivery (optional)
- Configure automated backups using AWS Backup
Conclusion
You have successfully migrated your WordPress website to AWS using an EC2 instance and MySQL database. This setup provides improved scalability, reliability, and performance for your website. Remember to regularly update your WordPress installation, plugins, and themes to maintain security and optimal performance.


